

AI image generation with ComfyUI and SD-XL
Introduction
The AI world is moving fast. Pre-trained models not only provide increasingly better results but also make more efficient use of the available computing power. The image engine presented in this article already runs on graphics cards with 4GB VRAM and can even be operated on the CPU without a graphics card.
It consists of two very powerful components:
- ComfyUI: An open source workflow engine, which is spezialized in operating state of the art AI models for a number of use cases like text to image or image to image transformations. It provides a super convenient UI and smart features like saving workflow metadata in the resulting PNG images. Depending on your preferences you can either download the full Github repository to access the source code or get the ready-to-run ZIP package in case you're not a coding person.
- Stable Diffusion XL 1.0: This model has been released in July 2023 and provides state of the art image generation capabilities. Personally I am very impressed by the results, and there are quite a few experts in the community who attest that this model can compete with Midjourney in terms of quality.
Installation
ComfyUI:
For the non-coders: I will not describe the installation process here in detail, because others have done that already in video form:
How to install and use ComfyUI - Stable Diffusion. - YouTube
For the coders: Just check out comfyanonymous/ComfyUI: A powerful and modular stable diffusion GUI with a graph/nodes interface. (github.com)
Stable Diffusion XL 1.0
You can download the base model files here:
stabilityai/stable-diffusion-xl-base-1.0 at main (huggingface.co)
You will only need these files:

And the refiner files here:
stabilityai/stable-diffusion-xl-refiner-1.0 at main (huggingface.co)
You will only need these files:

After you downloaded the files, you need to move them to the resprective folders in the ComfyUI directory.
The four biggest files go to 'ComfyUI\models\checkpoints' and the smaller file with "lora" in it's name goes to 'ComfyUI\models\loras'. Now it's time to run ComfyUI.
Use ComfyUI
After you started ComfyUI as described in the above Youtube video or in the manual in the repository you'll have the workflow designer in your browser and are ready to generate some images. The technology we're using here is complex and the freedom of choice might be overwhelming when using this for the first time. But don't worry, I'll give you some advice, which will make it easier to get the first results.
A very handy feature is that we can save workflows within the image files we're creating. The information is simply added to the metadata section of the PNG file. Thus you can download the images from this article and put them im the workflow designer via drag and drop.
Here is a first example of a very simple workflow. The prompt I chose is a tribute to one of the winners of the first round of the Summer Challenge.

Please note: The seed generator in this workflow is set to "randomize", thus each time you hit the "Queue Promt" button a differnet version of the image will be generated.
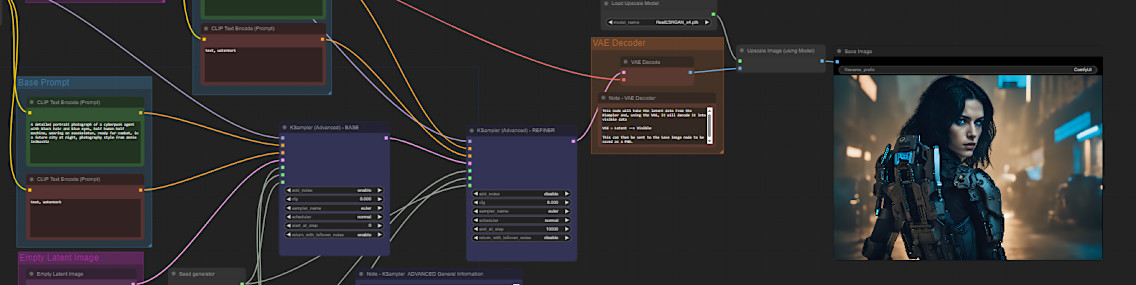
Here is another example with a more complex workflow, which will output the original image from the model plus an upscaled version. For upscaling I used the realESRGAN_x4 AI scaler, which I also downloaded from huggingface (ai-forever/Real-ESRGAN at main (huggingface.co)). You need to put the scaler model (.pth file) into 'ComfyUI\models\upscale_models' and relaunch ComfyUI.

And a third one, again with the more complex workflow. Here the seed generator is set to fixed, thus it will output the same picture every time you repeat the execution:

I hope you'll enjoy playing around with this tool as much as I do. Feel free to put comments/questions below.
